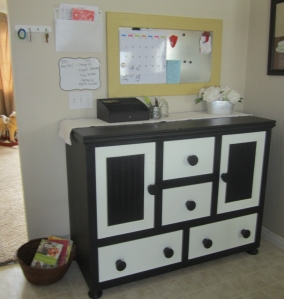
Here is my command center in my kitchen. I had a serious problem with the massive amounts of paperwork my children were bringing home, plus bills, catalogs, other to-do’s etc. I finished this about a year ago, and it has helped tremendously (as long as I don’t start letting things pile up.) 🙂
It includes:
Buffet/Cabinet – My grandma bought this for me at a yard sale. It is my favorite piece of furniture in my home. It’s cute and a bit whimsical, but also very functional and roomy. I use the two bottom drawers for my kids’ special artwork. I keep a glass container for pens, pencils, scissors, and tape and another container for change and small lost items (stray game pieces, buttons, etc.) on top.
Magnet board – This was another yard sale find, but the frame before had a “farmish” motif. (roosters, apples, etc.) Not my style. I purchased a sample size paint container and a foam brush. It only took a few minutes to paint over. I let it dry overnight, and my dear hubby hung it up. The left side has a magnetic calendar, and the right side has a magnetic clips for receipts and coupons and also serves as a revolving board for invitations, school events, photos, etc.
Dry erase sticker – I’m not very handy and love it when I can hang things up without using tools. This is just a dry erase decal from the Martha Stewart line at Staples. Peel and Stick! We write down house projects, car repairs, and other reminders here.
Hanging File Folder – Also from the Martha Stewart line at Staples. I spent a lot of time evaluating various hanging trays, but they are all so ugly and too “officey.” This one is very simple and modern. It’s almost a cardboard type material and sticks to the wall with heavy duty push pins. I use it as my “pending” folder. I keep things I need to reference or that I will need soon here.
Key ring/Cell phone tower – Wall hanging key ring and cell phone charger with room for my hubby’s wallet. I keep checks, stamps, and address labels here for quick bill paying.
Basket – I am always losing track of library books, movie rentals, and things that need returning. It all goes in this basket now so I can see and quickly grab what needs to be returned.
Here is what I try to do daily. I stop at the garbage can/recycling in on my way with the mail. I probably get rid of 75% of what’s in hands. If there’s a bill to pay, I grab a check, stamp, and address label, write it out, and have one of the kids take it to the mailbox. (I receive all my household bills through email and pay them online, so the only bills I usually get are medical bills.) Invitations and thank-you notes go on the magnet board. Any other to-do’s or pending items go in the hanging file folder. I don’t use many coupons, but I put them in my binder or on the magnet board. When the kids come home from school, most papers go into the recycling bin. I sign off anything they need and have them put it right back in their homework folders. Anything I want to keep goes in the bottom drawers of buffet.
It’s not a perfect system. I do let things stack up sometimes, but it only takes a few minutes to get back on track. It has been very useful overall. I’m not sure how I was functioning without it…..Oh wait, I wasn’t.


